How to Upload Content to a HostGator Subdomain

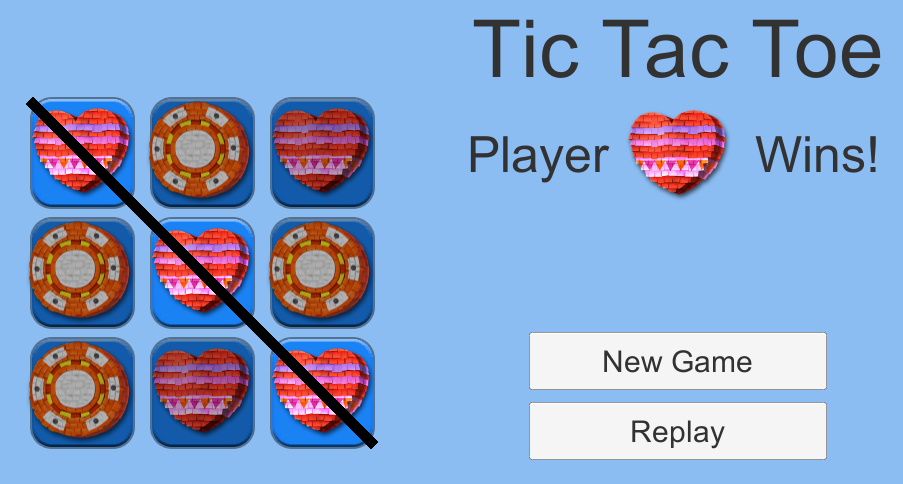
Tic Tac Toe Gameplay Image
Subdomains are subdivisions of a website’s primary domain. In the web address, the name of a subdomain appears before the domain name with a period separating them. For example, Extra Life’s domain is extra-life.org and the Extra Life Community website is a subdomain of Extra Life, community.extra-life.org. Subdomains are themselves websites. They can host WordPress sites, forums, wikis, custom HTML, games… Pretty much anything the main domain can host, a subdomain can as well.

If you already have a website hosted through HostGator, you can have as many subdomains as you want. How do you create a subdomain though, and how do you upload custom content to it? This guide will walk you through how to host a Unity 3D or RPG Maker MV project on a subdomain of your HostGator-hosted website, but steps 2 and 3 apply to any custom HTML you want to host. If the game stuff doesn’t apply to you, skip to there. Otherwise, read on! This tutorial assumes you are using a Windows machine, but the steps are similar for other platforms.

Step 1: Build your game

If you’d like to host a game you’ve built on a subdomain of your website and you haven’t built the game for the web yet, obviously, you’ll need to do that. 🙂 Below are basic instructions for Unity 2018 and RPG Maker MV.

Unity 2018

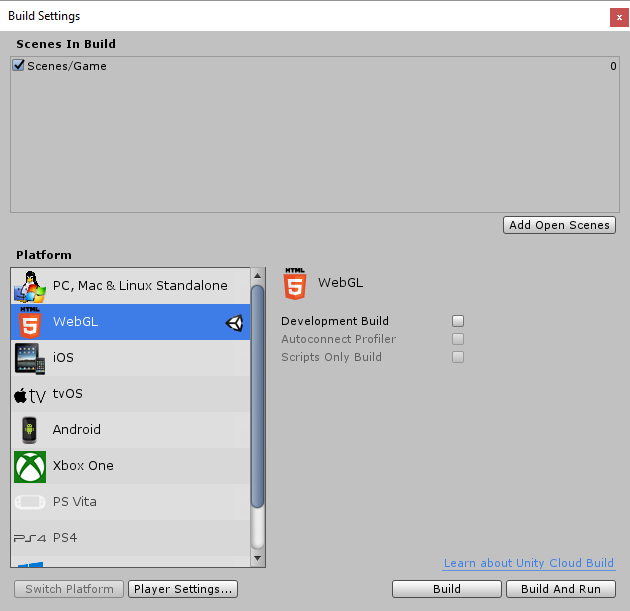
In Unity, open the File menu and select Build Settings…

Unity Build Settings

In the following window, check the scenes to include in the build and select WebGL as the Platform. You can find more settings by clicking the Project Settings… button. This article on Unity’s website has more information about these settings, the build process, and its products.

When you’re satisfied, click Build. Note that if you don’t have WebGL support installed, you will be prompted to install it. Otherwise, you’ll then select a folder to save the game files in. Unity will build the game and save two folders and an index.html file to your selected location.

Unity Web Build Products

You can test the game by opening the index.html file in a web browser. If you use Chrome, it typically doesn’t like accessing local files and will likely display an error message. You might want to use Firefox or another browser instead.

RPG Maker MV

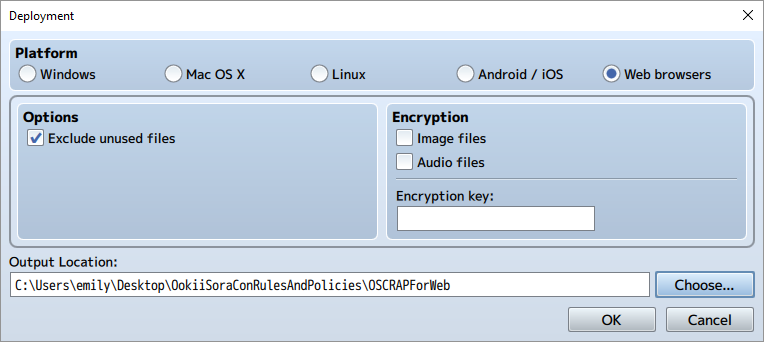
In RPG Maker MV, open the File menu and select Deployment…

RPG Maker MV Deployment Options

In the following window, check “Web browsers” from the Platform radio buttons and select an Output Folder. I also recommend checking the “Exclude unused files” option. If desired, you can also select to encrypt your Image or Audio files. When you’re done, click OK.

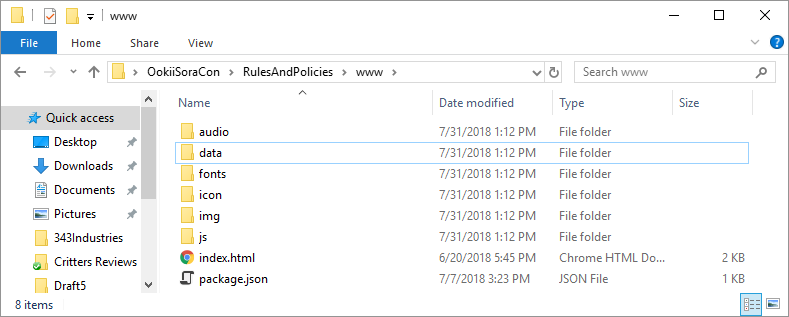
Within the location you selected, RPG Maker will produce an index.html file and several folders of assets. If you’ve added any extra folders to your RPG Maker project, these will also be copied automatically. I, for instance, had a folder where I saved json files produced by the Character Generator and a folder of Photoshop files for custom image assets. Feel free to delete these extra folders if they aren’t required for your game to run.

RPG Maker MV Web Build Products

You can test the game by opening the index.html file in a web browser. If you use Chrome, it typically doesn’t like accessing local files and will likely display an error message. You might want to use Firefox or another browser instead.

Step 2: Create a Subdomain

If you don’t have a subdomain for your project already, you’ll need to create one. You can do this within your website’s cPanel.

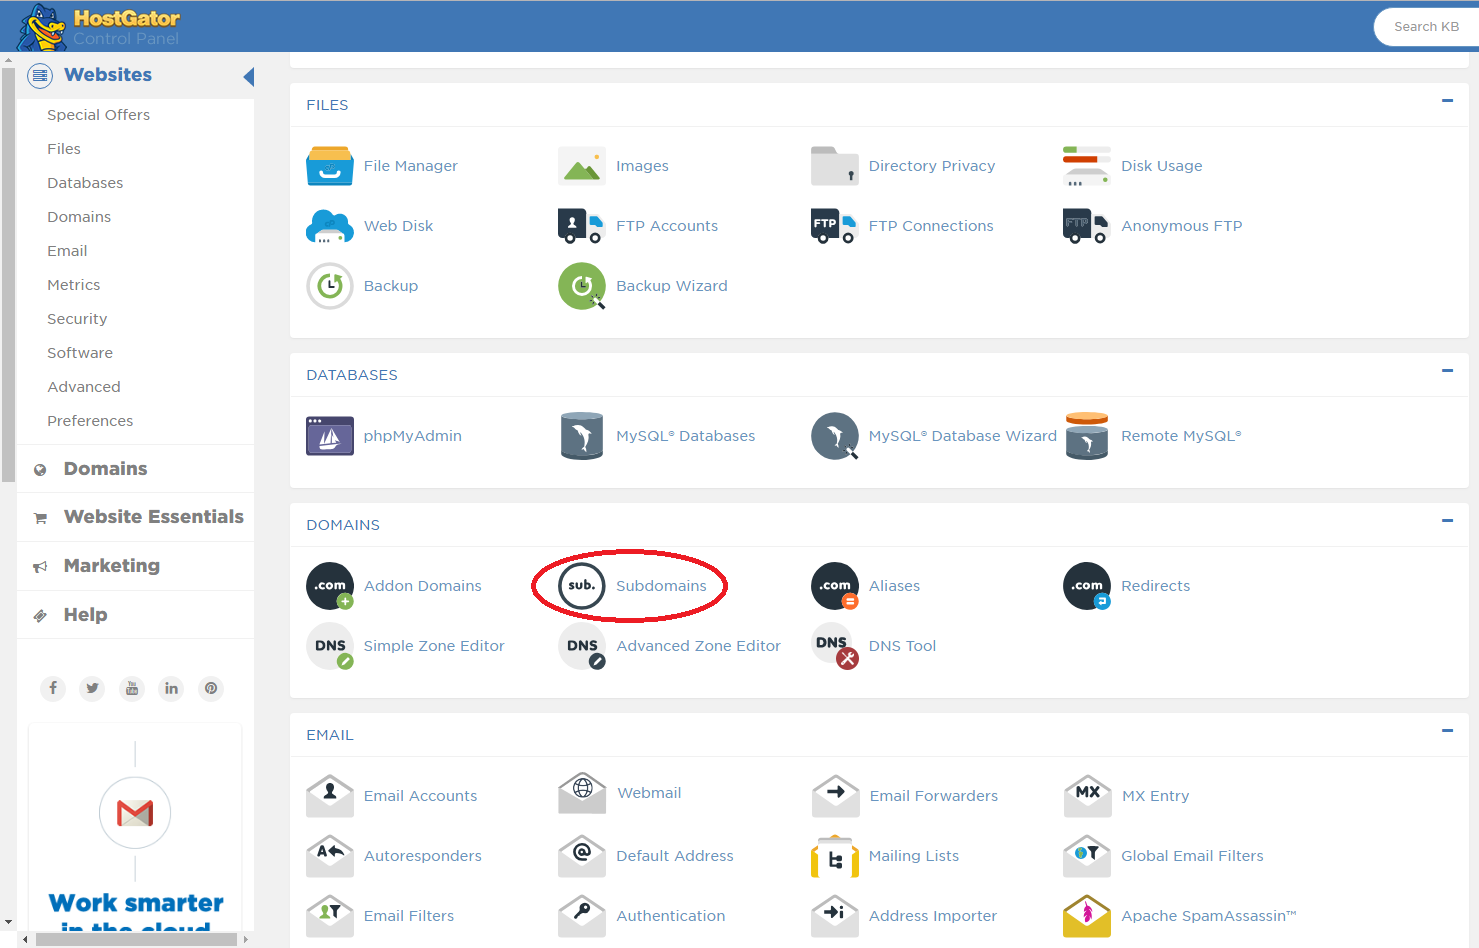
cPanel Subdomains

Step 2a: Login to cPanel

HostGator will have sent you an email with instructions on how to access cPanel when you purchased your domain and hosting service. Since I use shared web hosting, I log in to cPanel by navigating to a web address that looks something like “gator1234.hostgator.com:2083”. Once there, you’ll be prompted for your cPanel username and password. Note that these are separate from your credentials for entering the HostGator Customer Billing Portal or, if your primary domain hosts a WordPress website, your WordPress credentials.

You can find other methods to log in to your cPanel in HostGator’s article on the topic here.

Step 2b: Create a Subdomain

In cPanel, scroll down to the Domains section and click Subdomains.

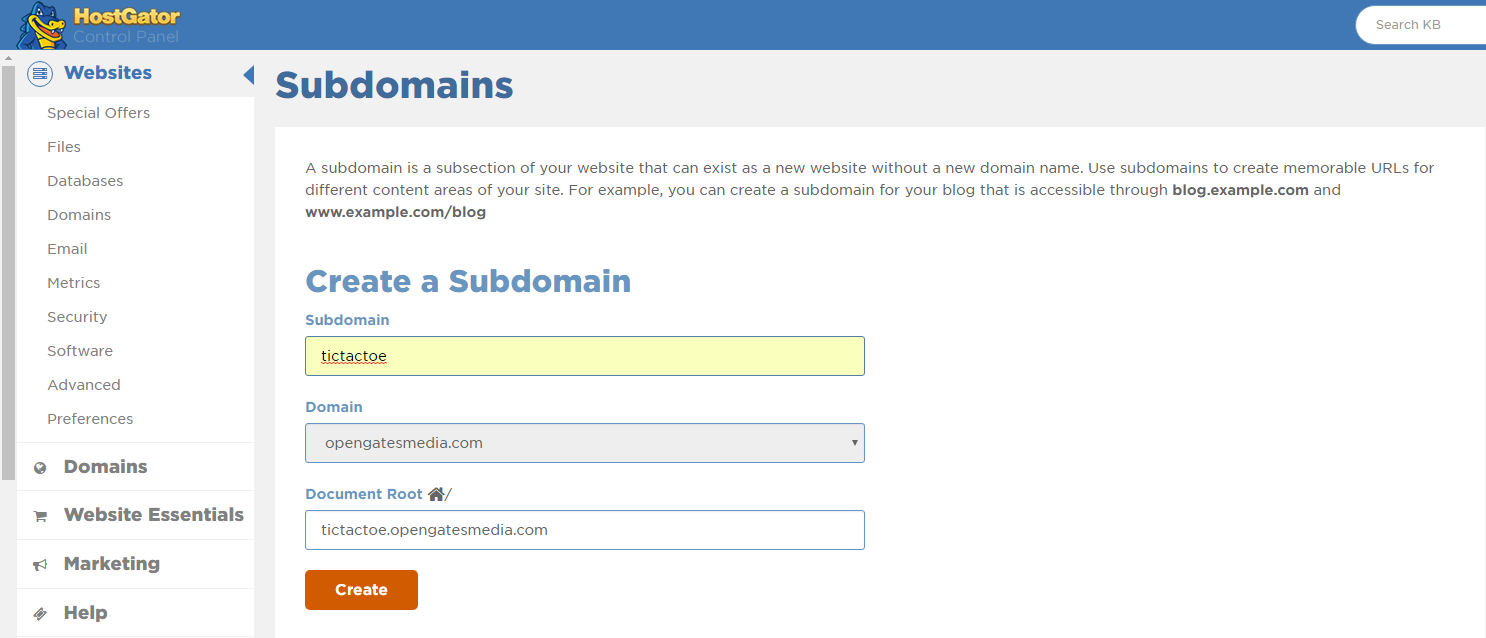
cPanel Subdomain Form

On the following page, enter the name of your subdomain in the Subdomain field. For example, if I wanted to host a Tic-Tac-Toe game, I could enter “tictactoe” as my subdomain.

When you’re done, click Create. You’ll see the Document Root field automatically populate with a folder that will contain the subdomain’s files on the web server. In my case, this default location is “tictactoe.opengatesmedia.com”.

Step 3: Upload the game files to your website

Now that the game is built and has a destination, you’re ready to upload the files to your website. We’ll do this with an FTP Client. If you’ve never used one before, this tutorial will use FileZilla. You can download it here.

Step 3a: Connect the FTP Client to the web server

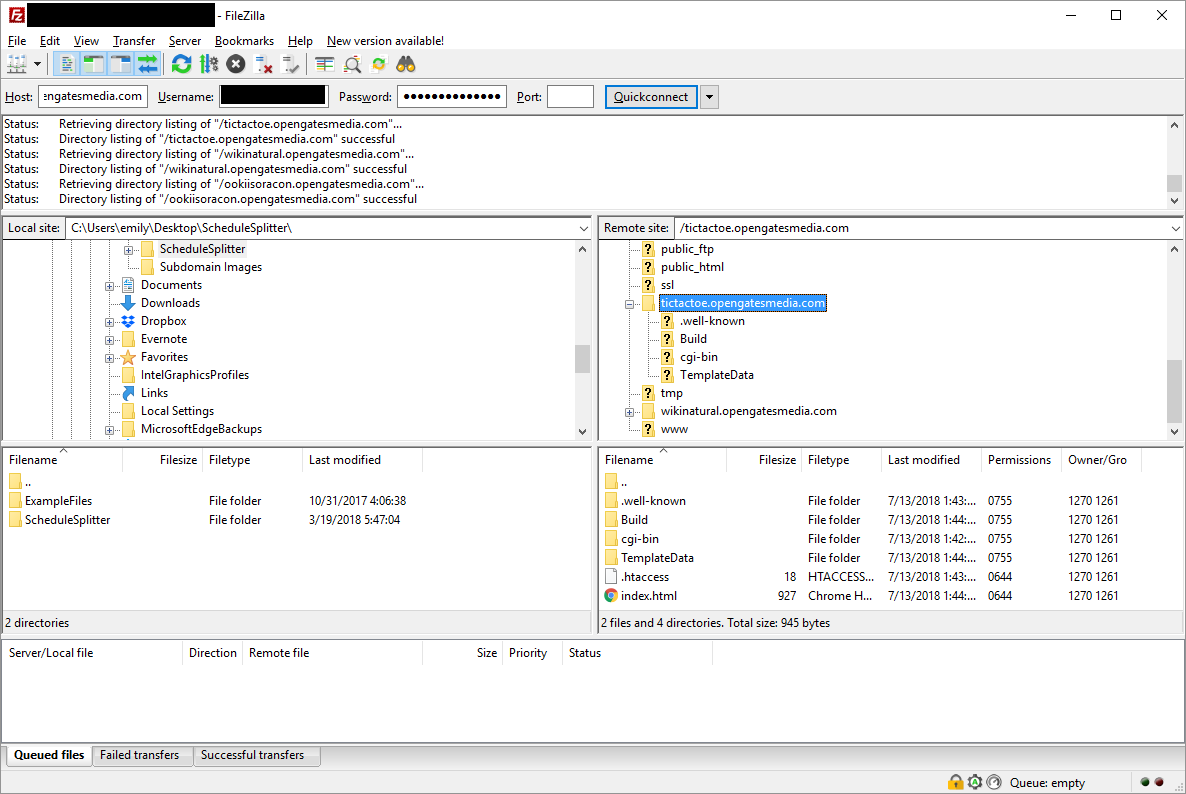
By default in FileZilla’s interface, the folder hierarchy displayed on the left corresponds to the contents of your computer. The hierarchy on the right corresponds to the folders and files on the web server, provided you’re connected to one. Let’s do this now.

Near the top of FileZilla’s interface, you’ll see a Host, Username, and Password field. Enter your domain name in the Host field. For me, this is opengatesmedia.com. Don’t include “http://” or “https://”. The username and password are the same as you would use to login to cPanel in a web browser. Once you’ve entered this information, click Quickconnect. You should now see the folders on the web server displayed on the right.

FileZilla Interface

Step 3b: Copy the files to the subdomain folder

The subdomain’s files will be located in the folder specified in the Document Root field when you set up your subdomain. If you didn’t change the default location, this will be a folder in the root directory with the name <yoursubdomain>.<yourdomain>.com. Mine, for example, is called “tictactoe.opengatesmedia.com”. Inside this folder, you’ll find two sub-folders and a .htaccess file. Add your game’s index.html file and the other generated folders to this folder. In FileZilla’s interface, you can do this by navigating to the files’ location on your computer on the left and dragging them to the subdomain’s folder on the right to copy them to the server. You can also open a separate file browser window on your computer and drag-and-drop them to the subdomain folder from there.

Once the files have finished copying, navigate to your subdomain in a web browser. For me, that’s tictactoe.opengatesmedia.com. If you get a 404 Not Found error, you may need to wait a few minutes to a couple hours for HostGator to finish setting up your subdomain. When everything’s up and running, you should be able to see and play your game!

Breaking Down Burst!

This evening on Twitch, Team KAIZEN demonstrated Burst! from early prototypes to the current version. Toward the end of the video, I add a brand new feature to Burst! in a ten-minute presentation. After that, my brother demonstrates how he makes songs for Burst!, using the latest version of the Song Editor. You can watch the full video on Team KAIZEN’s Twitch channel here.

Burst! March 2018 Update

Here’s a new video of Burst!’s latest features, including updated menus, new fireworks, firework sound effects, flashing windows that visualize the audio, a helicopter, a new song, and more!

WebGL and three.js Demos

I finally got around to cleaning up and collecting together some of the projects I made in an Introduction to Computer Graphics course, something I’ve wanted to do for a couple years. Topics I explored include procedural generation, ik-rigging, and animation. The projects even include a Frozen-inspired snowman with a head that perpetually falls off and a flying table. You can find the demos and source code on the GitHub page here.

WikiNatural Release

Wikipedia section in wiki natural
A section of a Wikipedia page displayed in WikiNatural.

I decided to resurrect an old project I co-developed for school, a 3D web browser for Wikipedia pages. You can even play around with it online because GitHub Pages is awesome. See the new WikiNatural page for ALL the details.

Asperger’s in the Tech Industry

I recently read this article “Everything wrong with Silicon Valley culture in one gross presentation” about Alex St. John’s views on what recruiters should look for in employees. Alex St. John is a trainer of recruiters in the tech industry or something like that. Among other somewhat sexist comments, he says that women in the tech industry are only good for communication and management, men are superior engineers and developers, and girlfriends and wives of employees are actually who companies must please in order to retain its employees.

What interested me most in the article though was St. John’s views on people with Asperger’s syndrome. To him, men with Asperger’s syndrome, identified by poor written and verbal communication skills, a machine-like work ethic, and few job changes, if any, were the holy grail of employees. Women with Asperger’s syndrome, however, were to be avoided because they wouldn’t be able to fulfill their stereotyped duties in a managerial role.

I’m a female software developer with some form of undiagnosed Asperger’s/high-functioning autism/social anxiety/perpetual shyness/awkwardness. I’ve always considered my anxiety, lack of ability for small talk, and slow speech my greatest weakness when it comes to finding a job and performing it. I’ve been told throughout my academic career that I must have these social skills to succeed, and while I’ve gotten a little better at speaking through the jobs that I’ve been fortunate enough to have throughout the years, I’m still a worse than average communicator and often feel inadequate. I’ve compensated for this weakness by broadening and deepening my skillset, developing my written communication skills, and working constantly on volunteer and personal projects.

Now, after years of thinking and being told that I’m inadequate, I’m reading that my lack of social skills is actually a beneficial trait that employers are being trained to look for? O.o *Sigh* If only I were a man… I could be taken advantage of in Silicon Valley… 😛

Representing a network of a non-linear book in Python

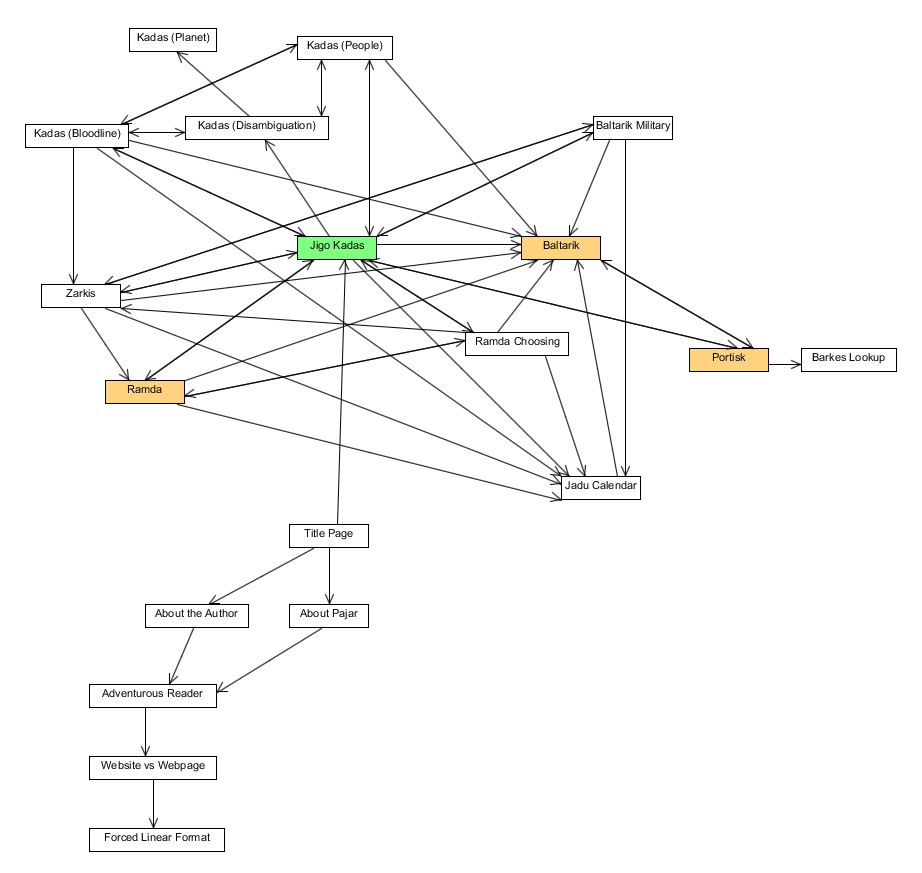
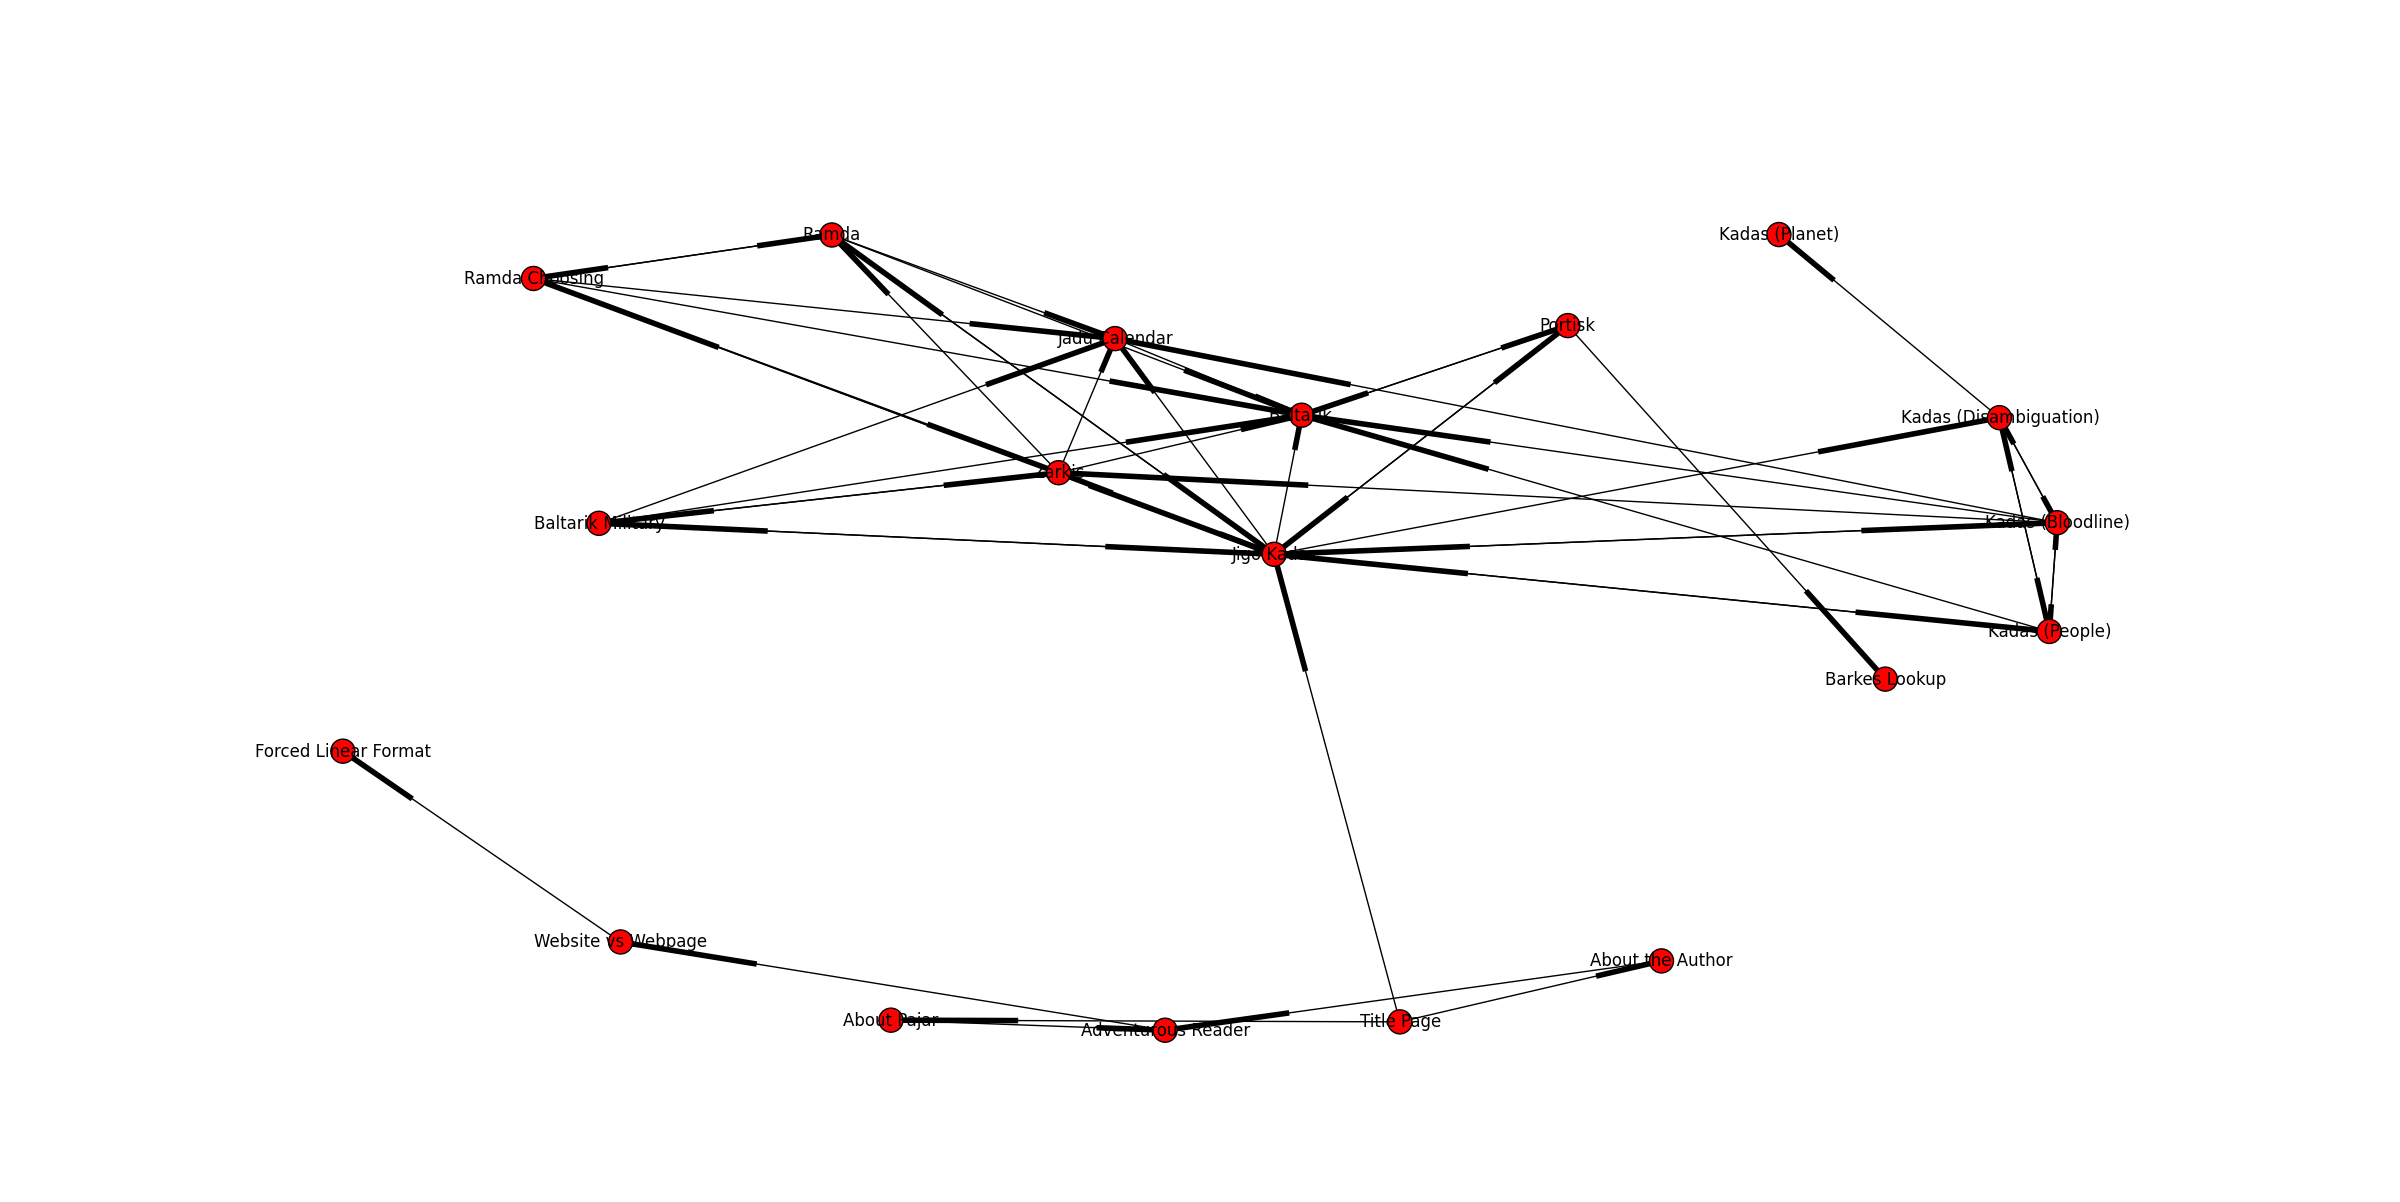
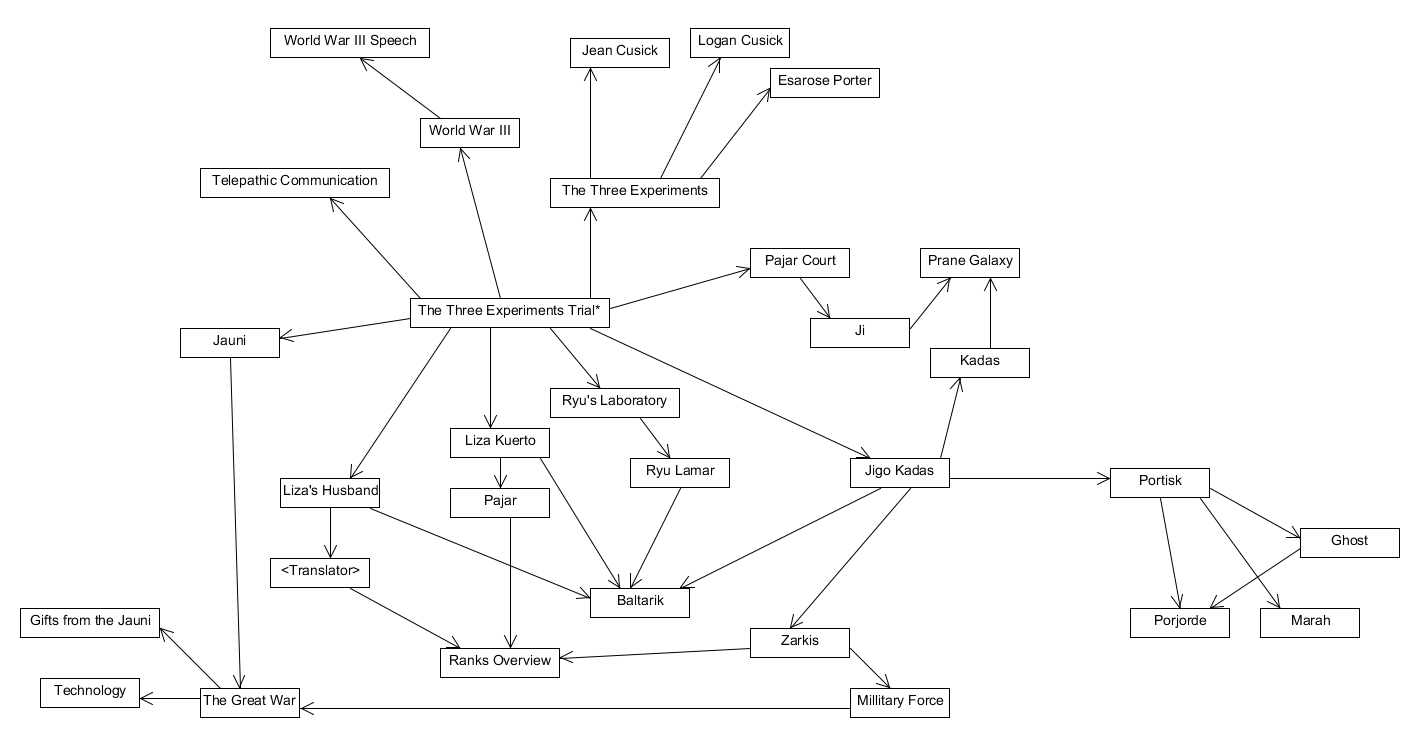
A sub-section of a non-linear novel was developed to test and demonstrate the non-linear eBook reader Adventurous Reader. The sections of this novel and how they connect together are shown in the networks below. It’s easy to see that this graph is going to get very messy, which is problematic because an interactive network will be the reader’s navigational tool as opposed to a table of contents. Considering that network visualization is a difficult problem to solve, I began research on how to better dynamically generate networks for Adventurous Reader.

Before visualizing non-linear book networks though, I needed a way to represent them. Adventurous Reader is being developed in Python, so I began by researching Python’s network/graph libraries and found networkx. This library stores networks as nested dictionary objects. Each node can store multiple attributes, including complex objects, and graphs can be directed or undirected. networkx also can write networks to files and read from files of various formats, which is important when it comes to saving the reader’s progress. It also has very basic node layout and visualization methods, but these are not powerful enough to create usable networks for complex non-linear novels.

While I will use networkx to represent the networks in code, I’ll need to look at other packages and libraries for visualization. The best options I’ve found so far are D3 and Graphviz. The problem is that D3 is a Javascript library and Graphviz is a C++ library. There is a way to use both of them in Python applications. I’ll need to determine which package will better fit my needs and then research how to integrate it.

UMLet layout
This network of non-linear book sections was handmade in UMLet.
networkx Spring Layout
This network has the same nodes as the network above but was generated using the default spring layout provided with Python’s networkx package.

Creating a map for a non-linear eBook

As part of the development of the non-linear ePub Reader Adventurous Reader, a story that takes advantage of how it will be viewed within it will be developed. This story should demonstrate that reading non-linear content within Adventurous Reader is significantly different from viewing it in a traditional linear reader and serve as an example of the types of non-linear and interactive books that can be written to engage readers in today’s world of fast-paced, short, various, and vast entertainments.

The story in development makes use of optional sections and storylines to create an experience that allows the reader to consume a short story but encourages them to explore the concepts discussed within it. In this way, the reader can have an experience that is as long or as short as desired. While there is enough material to make this story book length, developing a subset of the book’s content will suffice in testing the Adventurous Reader concept.

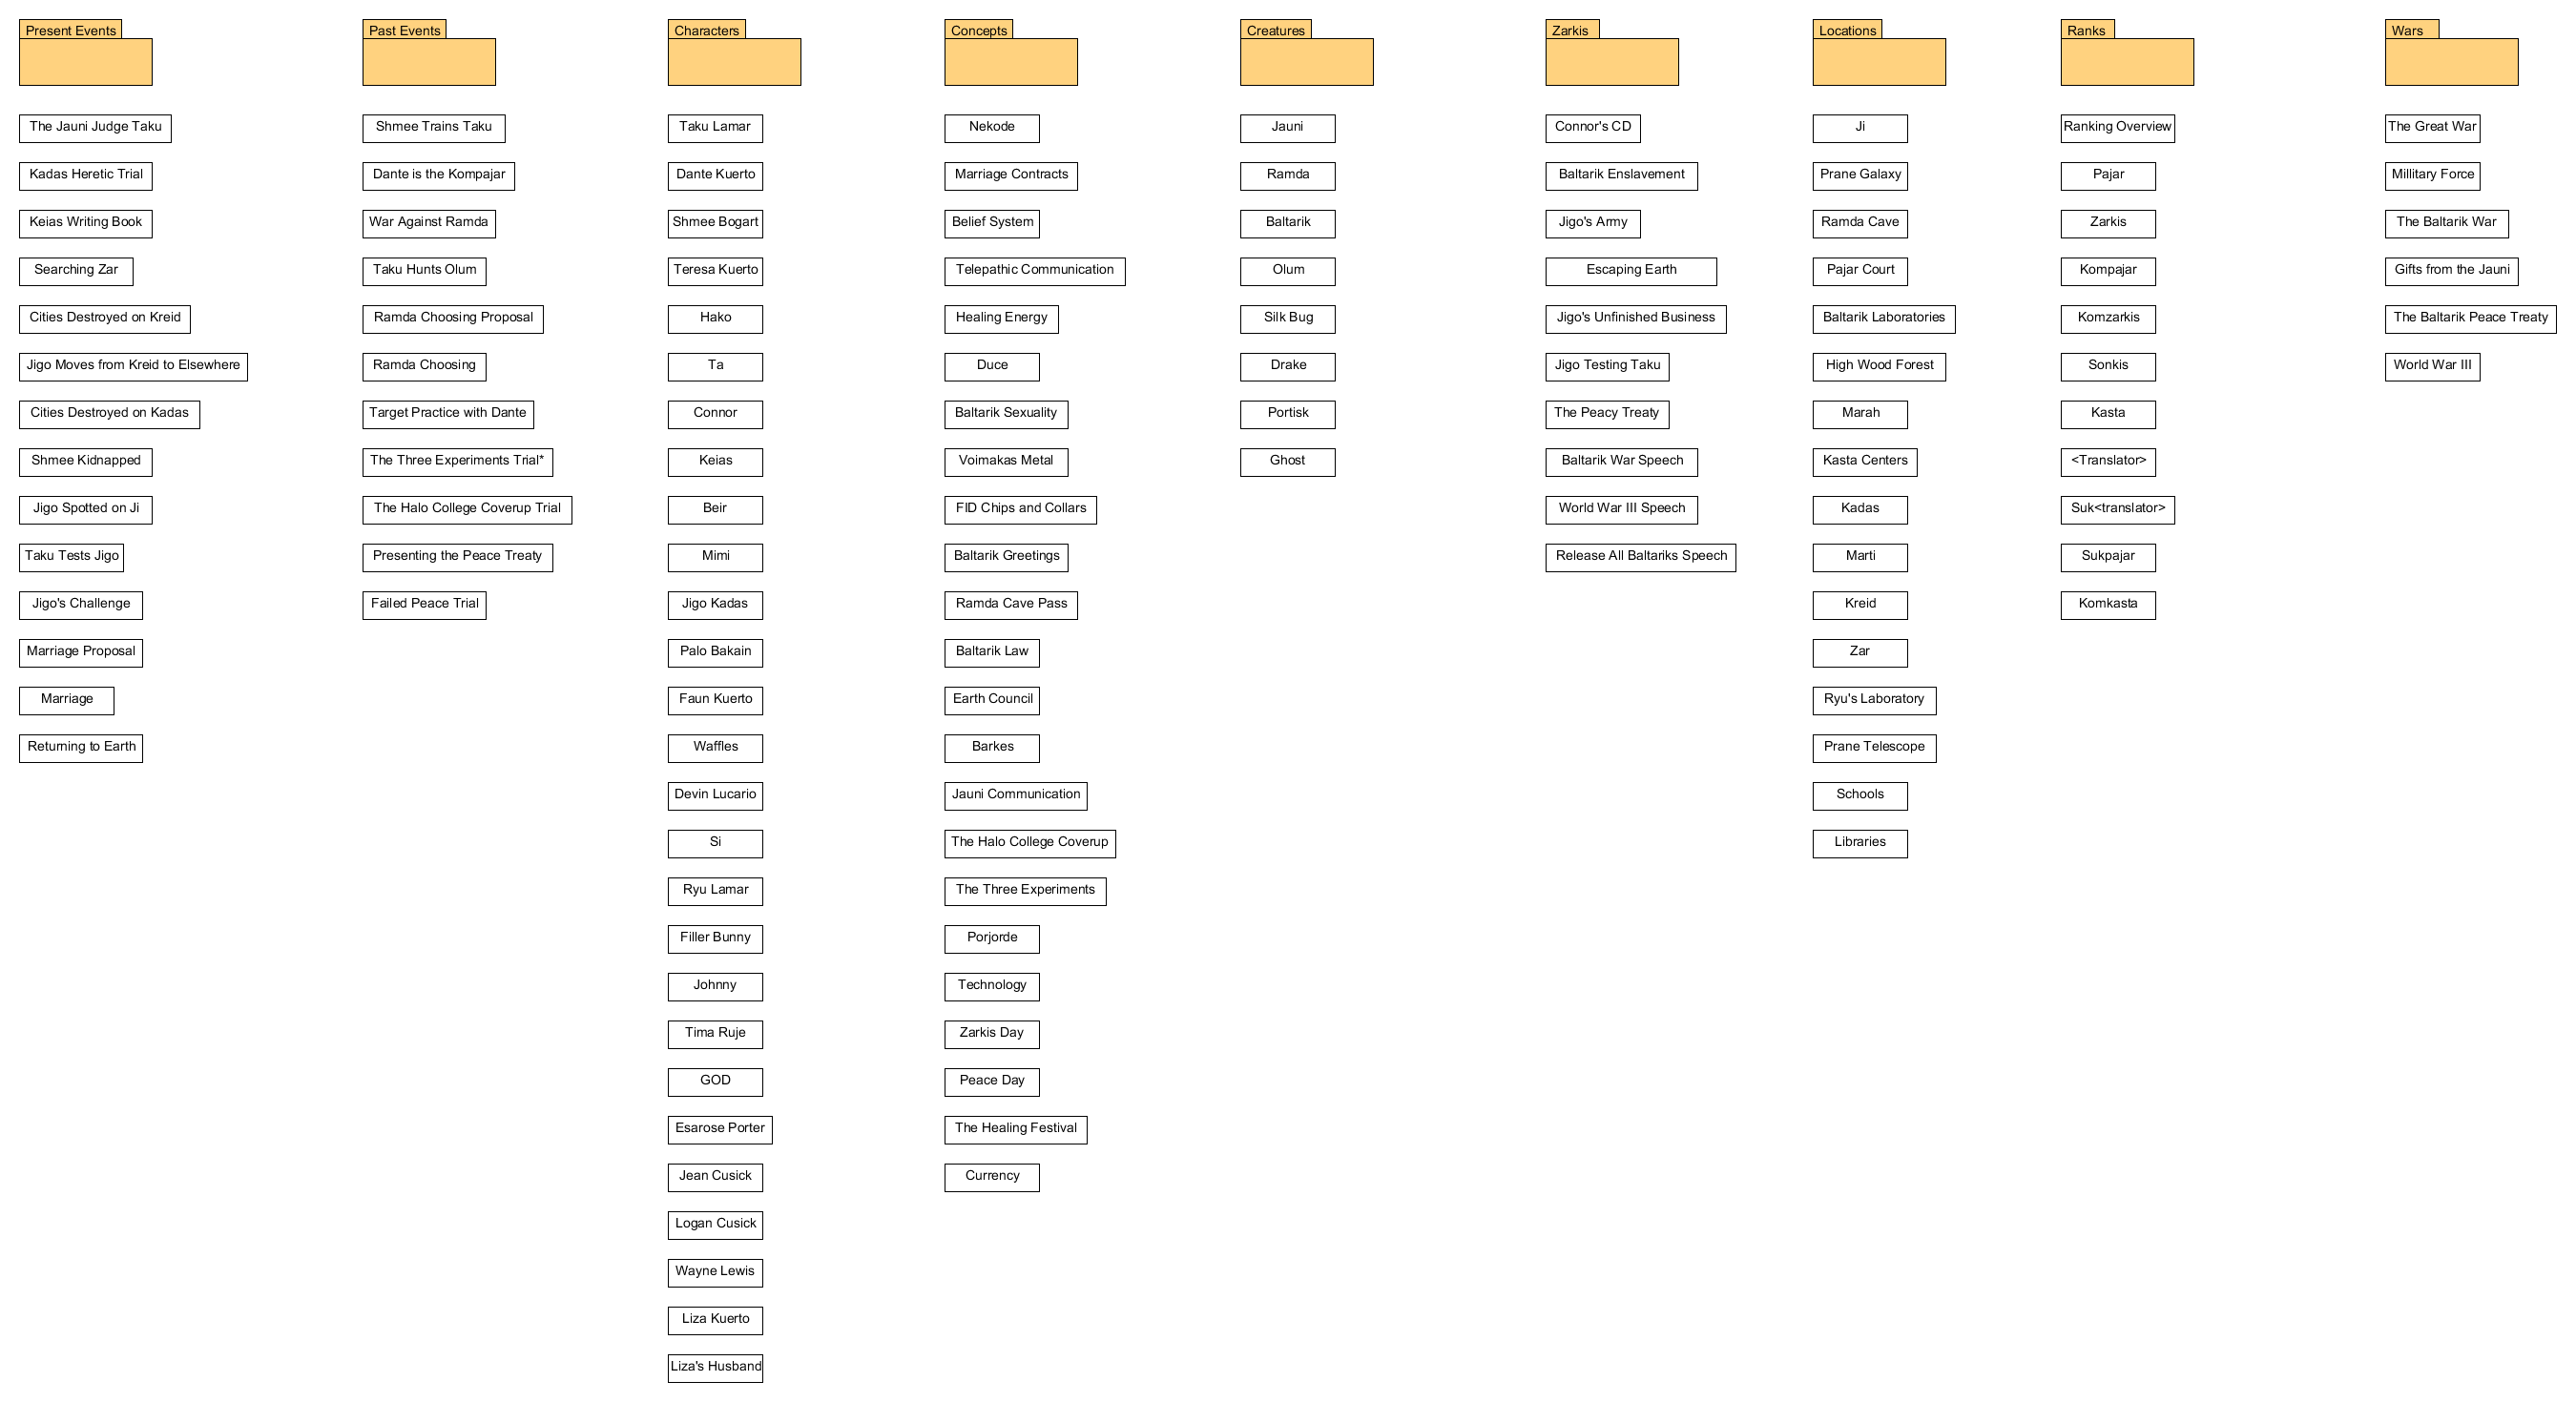
A preliminary list of all sections in the book.
A map showing how some sections of the book connect together.
A map showing the subset of the book that will be developed for demonstration. This map shows how some sections of the story will connect together.

eBook Reader Test

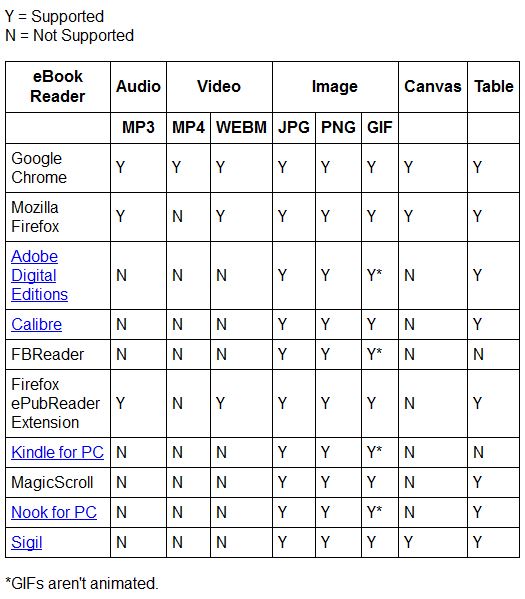
I created a test to determine what media various ePub and MOBI readers for PC could view: MP4, WEBM, MP3, JPG, PNG, GIF, Canvas elements, and HTML tables. The results are shown below.

eReaders For PC Summary